Our commitment to supporting Happy Joe

This week is an exciting one for Real Big Marketing. After years of focusing exclusively on providing quality services to clients, we will officially be releasing our first product: Render. We’ve worked hard to make Render as powerful and as useful as possible to those who use WordPress as a content management system and I think we’ve done a pretty good job. Much of the credit for this goes to our amazingly talented developer Joel who joined our team last summer.

But our excitement is not due only to this new offering our business will be adding. We are also excited to announce that through Render, we are going to be adding something else to our business: donations to a cause. At Real Big we strongly believe that businesses have a responsibility to do more than focus on profits alone. It is important to invest in and seek to better our community and to constantly strive to make a difference in the lives of others. To this end, we’ve decided that the launch of Render is the perfect opportunity to incorporate this kind of contribution into our business. Enter Happy Joe.

Happy-Joe-LogoHappy Joe

Happy Joe is a non-profit organization which focuses on helping veterans succeed in this digital age. By helping former military men and women develop skills, find jobs and start businesses, Happy Joe is truly making a difference to others. The organization was founded by James Dalman who is a veteran himself and also a talented designer and WordPress guru.

I reached out to James recently to let him know that we supported Happy Joe and also that we were very interested in doing what we could to support his efforts to help veterans. Our company is 50% veteran owned and supporting those who served our country is something we strongly believe in. I also told James that we were a small company and couldn’t afford to make a very sizable one-time donation. However, we did have a new product launch in the works and would be interested in using that as an opportunity to contribute. I also explained to James that giving in this manner would be ideal for us because ultimately, we want giving to be something that we DO rather than something that we DID.

James was very supportive of the concept of continuous giving and expressed to me that he’d like to introduce it as an alternative way of supporting Happy Joe for prospective sponsors. We would be the first to pioneer this new program and hopefully inspire others to follow suit and make giving to Happy Joe a part of what they DO as well.

Our contribution

After several discussions with James and an evaluation of our own financial goals, we decided that we would commit to donating 25% of all sales of Render directly to Happy Joe. We believe this amount is enough to make a real difference while allowing us to remain sustainable and continue to grow this portion of our business.

An official announcement from Happy Joe can be found on their blog. In that announcement you’ll also see a video of James and I discussing this partnership as well as the Render plugin. You can also learn more about James in an upcoming episode of WP Round Table in which myself and several friends will be interviewing Mr. Dalman and digging deeper into his experiences, challenges, hopes, ideas and goals.

Your part

Happy Joe is making a difference but there is still a lot to do. If you are interested in doing your part to help better the lives of military veterans and their families then visit the Happy Joe website, follow Happy Joe on Twitter, contact James Dalman and, if you use WordPress and need a better way to include complicated elements into your content then consider checking out Render.

We are releasing a premium WordPress plugin

At Real Big Marketing we have been using WordPress to help our clients achieve their goals for years. Over the course of those years we’ve gained experience with the platform and have participated in the WordPress community in a big way. From publishing free plugins, to contributing patches to Meta trac, to co-organizing a meetup and a WordCamp, we have made a name for ourselves as the WordPress guys.

And so now we’ve taken another big step and are announcing the release of our first official product, Render. Render is a plugin for WordPress which enables content creators to insert complex elements anywhere they desire with very little effort. What sort of complex elements? Here are a few examples:

  • A dynamic list of posts
  • Content in a column layout
  • Content that is visible or hidden based on conditions such as whether a user is logged in or not
  • Information about the current user such as their username and email
  • Many more

Here’s a video which demonstrates what the plugin does:

The plugin includes a very easy to use interface for adding these elements to a post’s content or even a sidebar. It is also incredibly developer friendly so taking advantage of the functionality that Render provides is a snap for anyone with basic WordPress coding skills.

What does this mean to you?

If you use WordPress…

Consider taking a look at Render to see if it might be able to help you create better content more easily. We’ve packed it with very useful and unique features and invested heavily in the User Experience to ensure the use of the features is painless for even basic users. And let us know what you think! Do you see any way that we could make it better? Do you have questions about it? We’re here to help.

If you are a client or considering hiring Real Big Marketing…

Know that our commitment to providing the highest quality marketing services to all of our clients is unchanged. Consider this an illustration of the fact that we are more than capable of developing quality custom solutions and you will have to search for a while to find a team more comfortable and experienced with the WordPress platform. If anything, this demonstrates how important it is to us that what we develop is easy to use.

How To Customize the WordPress Admin Menu

For as long as I’ve used WordPress, the admin menu has been a component I’ve wished for more control over. In stark contrast to the menus one can assemble for the front end of a WordPress site, the backend menu is extremely inflexible. There have been countless times that I’ve wished for an easier way to modify the WordPress admin menu to improve the experience for my users and even myself.

To be fair, it has always been possible. Plugins have existed for some time that enable users to take a little control over the WordPress admin menu. In addition, anyone with development skills can make their vision a reality by writing some code. But most long time users would agree with me when I state that no easy solution has been available.

Today, thankfully, that is no longer true. We’ve spent quite a bit of time and effort on this particular issue and recently incorporated an elegant admin menu customization feature in the latest release of Client Dash. So, here’s how you customize the WordPress admin menu using this plugin:

1. Install and activate Client Dash

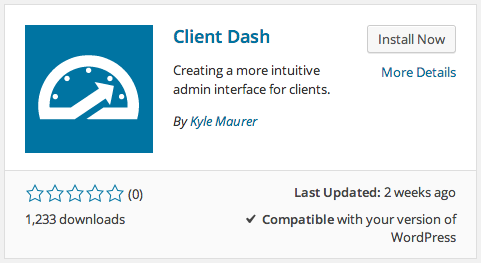
Install the Client Dash WordPress Plugin

It is a free plugin listed on the WordPress.org plugin repository so you will be able to find it by searching within your WordPress site’s Add New plugin feature.

2. Navigate to the Menus section in the plugin’s settings

Go to Settings – >Client Dash. The second tab will be Menus. Go there.

3. Select a role

Where it says “Select a menu to edit”, click in the dropdown and select the role you would like to customize the admin menu for. Then click on the Select button.

Select a role to create a custom WordPress admin menu for

4. Create the menu

Ensure that “Import role’s existing menu items?” is checked and hit the Create Menu button. This will show a progress bar briefly as the menu that the selected role is currently seeing is imported. This way you don’t have to start from scratch but can easily modify what users with this role are already experiencing.

5. Add new menu items (optional)

Add items to WordPress admin menu

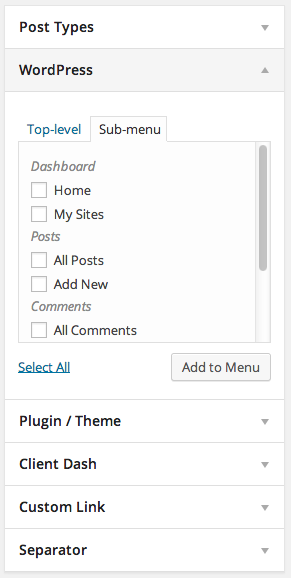
If desired, you will now be able to select available menu items from the left side of your screen and add them to the menu. You will then be able to drag and drop them to their desired location in the menu. Indent them to the right if you wish for them to be submenu items.

6. Remove menu items (optional)

Each item in your menu will have a drop down arrow on the right. Clicking on this will cause the item to expand and present other options. On the bottom left you will see Remove which will delete the item from the current menu.

7. Change menu item labels (optional)

If you’d like to change the actual name of an item simply expand that item and change the text in the Navigation Label field. This will not change how the item works or where it goes but only what it says. Here are a few ideas of labels you might consider changing:

  • Posts – >Blog
  • My Sites – >Your Sites
  • Your Profile – >About You
  • Media – >Pictures
  • Plugins – >Features
  • Plugins – >Addons
  • Dashboard – >Home
  • Add New – >Create New

This is where it would be a good idea to consider your site’s users and what skill level and familiarity with existing terminology they have. A good idea might even be to interview them and ask them to describe what they expect to see in their dashboard and what words they understand.

8. Change menu item icons (optional)

Change icon for WordPress admin menu item

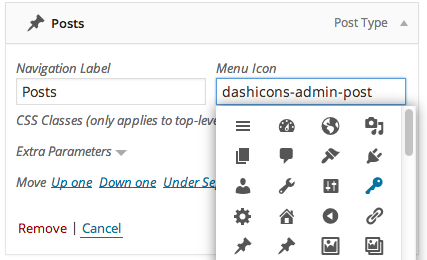
Icons can communicate as clearly as words so choosing the right icon for your admin menu items is important. To change them, simply expand a menu item and click inside the Menu Icon field. A drop down will appear which will list all the available icons. Clicking on the icon you want will automatically add it to the current menu item.

9. Save your changes!

Once you hit Save Menu, all users with the selected role will begin seeing the menu you just created.

10. Test your menus

If you want to verify that everything is working correctly and see what your users are seeing it is simple to do so. I would recommend one of two plugins which could help you do this:

  • Role Quick Changer – This plugin allows administrators to easily change their role on the fly in order to experience their site as a user with another role would. Very handy.
  • User Switching – Gives you the ability to switch your account to a different specific user, experience the site as they see it, and then switch back. Super useful for understanding what clients are actually seeing when they login. For testing all roles it does require that a user with each role exists that you can switch to.

Other notes

  • Each role will continue using the default menu arrangement until you create a new menu for them and save it. So if there is only one role you need a custom menu for, don’t bother making one for the others. Simple as that.
  • If for some reason you don’t want to use your custom menu for a certain role, it is helpful to simply hit the Off toggle next to the top save button. This will save your custom menu but will not enforce it on users with that role. Instead they will go back to seeing the default settings for their role until you decide to turn your custom menu back on.

I hope this is helpful. If you have thoughts on this tutorial, please leave a comment below. If you like the plugin, please consider leaving a review.

How to create WordPress shortcodes

So today we’re going to learn how to take our code snippets and turn them into handy, dandy little shortcodes.

Shortcodes are one of the coolest features of WordPress from a content creator’s perspective. They allow users to execute code segments beyond what the WYSIWYG editors can handle, keep the code consistent site wide, make things far more concise, all while editing and not having to live in fear of their code getting stripped out or boggled up when editing later. All good things.

Functions.php or plugin?

An old discussion of course. Ultimately it comes down to whether you want the shortcode to depend on the theme or not. Will you be using this shortcode on other projects? Could it be useful with a different theme? It takes almost the same amount of time whichever you choose and each will work just as well for the current project.

Let’s make a shortcode

I’m going to use a bunch of examples of actual shortcodes that I have created for recent projects.

Shortcode 1: Output string


//[op] outputs the phone number
function our_phone() {
 return "(269) 588-0556";
}
add_shortcode('op', 'our_phone');

This code will allow me and all the other authors on this site to not have to remember our phone number and also change it globally if we needed to. This was handy on a recent project where there were multiple authors on the site and multiple phone numbers. Making a shortcode like this for each one made it easier for authors put the number into their content without looking it up each time and also allowed us to change the number everywhere when we wanted to by just changing the shortcode.

Shortcode 2: Output current month


//[month] shortcode. Outputs current month.
function kjm_month() {
$kjm_date=getdate(date("U"));
return "$kjm_date[month]";
}
add_shortcode( 'month', 'kjm_month' );

This shortcode came in handy for my team because several authors were frequently writing promotional pages on the site and often the promotions were similar from month to month so this shortcode allowed them to automatically output the current month in their copy. This way they didn’t have to go back on the first of each month and update every single page that contained a monthly promotion.

Shortcode 3: Countdown timer


//[cdt] countdown timer shortcode
function content_countdown($atts, $content = null){
 extract(shortcode_atts(array(
 'month' => '',
 'day' => '',
 'year' => ''
 ), $atts));
 $remain = ceil((mktime( 0,0,0,(int)$month,(int)$day,(int)$year) - time())/86400);
 if( $remain >= 1 ){
 return $daysremain = "$remain";
 }else{
 return $content;
 }
}
add_shortcode('cdt', 'content_countdown');

Now we’re getting to a shortcode with attributes. This snippet is an only slightly modified version of one created by Kevin Chard at WPSnipp. What my version does, is it shows the number of days remaining before a specified date. This was also very handy for the authors on this site who would run monthly promotions which had an end date, and this allowed them to automatically display to the site’s visitors how many days remained before the offer would expire.  The purpose was to give a sense of urgency and drive sales.

But what’s going on inside these shortcodes

Let’s take just a second to explain some things:

  • When outputting data we always use return whereas in many normal programming instances we would use echo. Using echo will usually return some funky results.
  • The add_shortcode() function accepts two parameters. The first is the shortcode you want to create (the word(s)/phrase you enter in the square brackets) and the second is the function that it will execute.
  • Best practice for your shortcode names and attribute names would be lowercase.

There are truly thousands of things you could do with shortcodes. I greatly appreciate the ability to condense code snippets and re-use them endlessly. On a different project I took a complicated archive page on a website that had hundreds of lines of code and brought it down to four lines with massive improvements.

Here are a few ideas of what you can do with shortcodes:

  • Output strings of text
  • Make buttons
  • Create forms
  • Implement social sharing buttons
  • Embed videos
  • Embed tweets
  • Embed Facebook status updates
  • Show featured posts
  • Show featured products
  • Include custom javascript
  • Create HTML elements (tables, divs, sections, etc.)
  • Insert media
  • Insert photo galleries
  • Display countdown timers
  • Display user count
  • Display comment count
  • Insert animated sliders
  • Include interactive calculators
  • Many many many more!

I’d love to learn about what shortcodes you have created or would like to create. Share in the comments below.

How to make a basic WordPress plugin

There’s no doubt that the web is full of great tutorials on getting started with real WordPress development. Lots of developers far more talented than myself have provided helpful guides on plugin development. Even so, I am going to take the time to contribute my own tips to those wishing to take WordPress to the next level.

The basics

I think its always constructive to begin with the fundamentals. So…what are plugins?

Plugins are packages of code (can be very small to very large) that when activated within WordPress, modify or extend the features and functionality for your site.

For clarification purposes, there are (basically) four components that work together to make WordPress work:

  1. WordPress core
  2. Themes
  3. Plugins
  4. MySQL database

Whenever you want to do something cool or when you have problems these are basically the only areas of interest. It is worth noting that numbers 1 and 4 are basically never tampered with directly (unless you are super advanced or out of your mind).

Lets make a plugin

WordPress is built on PHP so that language is the basis for our plugins. If you are not familiar with PHP but have experience in other languages, this should be pretty easy for you at the basic levels. If you have no programming experience at all, this may be a little challenging but I’m confident that you can do it.

For starters, to make this as easy as possible, I created a starter plugin that should give you a great head start.

https://github.com/brashrebel/starter-plugin

All you have to do is unzip the file and begin editing files within. I recommend a program like Sublime Text but some other good options could be:

Upload that unzipped folder to the wp-content/plugins directory and you are ready to get moving.

basic wordpress plugin
The file structure for this starter plugin

Lets check out the code

For starters you’ll see that I created a couple files and a couple folders. Not every plugin requires this much stuff. In fact, many basic plugins are just a single PHP file. However, it is good practice to segment your code in a logical way so that it is easier to modify, troubleshoot and understand later.

The first file we’ll look at is the starter-plugin.php file. You’ll see that this file starts with a comment. This is an essential part of every plugin. It tells WordPress “Hey, we gotta plugin here” so it can display it as an installed plugin in your dashboard and so you can activate it.


<?php
/*
Plugin Name: Starter Plugin
Description: If you want to make a plugin, this gives you a great starting point.
Version: 1.0
Author: Kyle Maurer
Author URI: https://realbigmarketing.com/staff/kyle
*/

Below that you’ll see some more descriptive comments that are my explanations of whats going on.

The next thing you’ll see is:


require_once (dirname(__FILE__).'/admin/admin.php');
require_once (dirname(__FILE__).'/shortcodes.php');

What this does is grabs a couple of the other files included in this plugin so that they can be used as well. Just throwing files into our plugin’s directory isn’t enough, we need to include them as above.

It is worth noting that one could also use ‘include’ or ‘include_once’ instead of ‘require_once’ here. I found a great explanation of the difference between ‘require’ and ‘include’.

Next you’ll find some code for including a stylesheet. Notice that the ‘add_action’ line is commented out since I don’t actually want to enqueue this stylesheet if this plugin gets inadvertently activated.


//add_action('wp_enqueue_scripts', 'my_styles');
 function my_styles() {

 //This is for setting an optional condition for when you want to include your style (if you don't want it everywhere)
 global $post_type; //variable for getting current post type if needed
 if ($post_type == 'my-post-type' || is_singular('my-post-type')) :

//Now we actually register the stylesheet
 wp_enqueue_style("starter-plugin", plugins_url("/css/style.css", __FILE__), FALSE);
 endif;
}

The last thing in the main file is a function for including some Javascript. Just like with stylesheets, it is appropriate to enqueue your scripts properly so that they are output in the right place and at the right time.


//add_action('wp_enqueue_scripts', 'my_cool_script');

function my_cool_script() {
 wp_enqueue_script("coolscript", plugins_url("/js/script.js", __FILE__), FALSE);
}

The other files

I won’t bother to go through all the other files as they are mostly just placeholders with nothing in them but maybe a comment. I’ll mention the shortcodes one though.

I often write quick, little shortcodes for content related items I, or other authors, may use frequently. So many of my plugins have a shortcodes file. Here’s the example one from the starter plugin:


function my_shortcode() {

return "Three is the number to which thou shalt count.";
}
//This part first creates a shortcode, then names the function that gets run when we use this shortcode
add_shortcode('yippee', 'my_shortcode');

One thing worth noting, for those familiar with PHP, is that ‘return’ is used to output content in shortcodes instead of echo. You can read the codex on shortcodes for more detail.

Taking it further

Well, now you have the basics of writing a plugin. The next step is…to think of some plugins to create. There are a million-trillion possibilities (fact!) for making WordPress plugins. Here are some other suggestions and notes:

  • When adding basic functionality to your site, the option of adding your code to your theme’s functions.php file OR creating a plugin will typically be a consideration. Generally speaking, you would only use the theme option if your function is ONLY useful with the current theme AND you have little to no interest in reusing it on other sites later.
  • WPSnipp is a fantastic resource for lots of simple scripts that I think are perfect for plugin beginners. Just grab one of the many useful snippets published, modify to suit your needs and then drop it in your plugin. Boom. Done.
  • WPBeginner, DoItWithWP, WP Tuts+, CSS Tricks and DigWP are just a few of my favorite resources for cool scripts that can inspire and empower you.
  • If you manage to create a plugin that works well for you, you might consider publishing it on the WordPress Plugin Repository so that others can benefit as well. Just go here to submit one. The requirements are…not really a big deal. If it works for you and there is a chance others might also find it useful, I’d recommend just publishing it. Other users will be able to notify you of bugs and possible features to add. Its really a win-win.

I hope this was helpful to some. I’d love it if anyone shared comments with ideas on how this could be made easier as well as other tips for first time plugin developers.