How To Customize the WordPress Admin Menu
For as long as I’ve used WordPress, the admin menu has been a component I’ve wished for more control over. In stark contrast to the menus one can assemble for the front end of a WordPress site, the backend menu is extremely inflexible. There have been countless times that I’ve wished for an easier way to modify the WordPress admin menu to improve the experience for my users and even myself.
To be fair, it has always been possible. Plugins have existed for some time that enable users to take a little control over the WordPress admin menu. In addition, anyone with development skills can make their vision a reality by writing some code. But most long time users would agree with me when I state that no easy solution has been available.
Today, thankfully, that is no longer true. We’ve spent quite a bit of time and effort on this particular issue and recently incorporated an elegant admin menu customization feature in the latest release of Client Dash. So, here’s how you customize the WordPress admin menu using this plugin:
1. Install and activate Client Dash

It is a free plugin listed on the WordPress.org plugin repository so you will be able to find it by searching within your WordPress site’s Add New plugin feature.
2. Navigate to the Menus section in the plugin’s settings
Go to Settings – >Client Dash. The second tab will be Menus. Go there.
3. Select a role
Where it says “Select a menu to edit”, click in the dropdown and select the role you would like to customize the admin menu for. Then click on the Select button.

4. Create the menu
Ensure that “Import role’s existing menu items?” is checked and hit the Create Menu button. This will show a progress bar briefly as the menu that the selected role is currently seeing is imported. This way you don’t have to start from scratch but can easily modify what users with this role are already experiencing.
5. Add new menu items (optional)
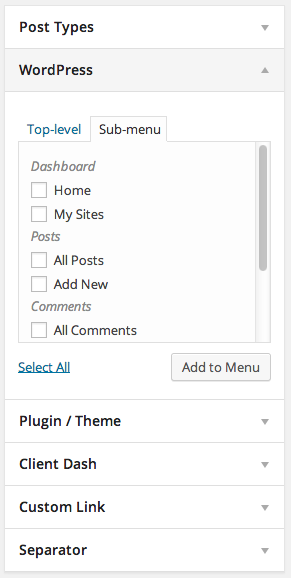
If desired, you will now be able to select available menu items from the left side of your screen and add them to the menu. You will then be able to drag and drop them to their desired location in the menu. Indent them to the right if you wish for them to be submenu items.
6. Remove menu items (optional)
Each item in your menu will have a drop down arrow on the right. Clicking on this will cause the item to expand and present other options. On the bottom left you will see Remove which will delete the item from the current menu.
7. Change menu item labels (optional)
If you’d like to change the actual name of an item simply expand that item and change the text in the Navigation Label field. This will not change how the item works or where it goes but only what it says. Here are a few ideas of labels you might consider changing:
- Posts – >Blog
- My Sites – >Your Sites
- Your Profile – >About You
- Media – >Pictures
- Plugins – >Features
- Plugins – >Addons
- Dashboard – >Home
- Add New – >Create New
This is where it would be a good idea to consider your site’s users and what skill level and familiarity with existing terminology they have. A good idea might even be to interview them and ask them to describe what they expect to see in their dashboard and what words they understand.
8. Change menu item icons (optional)
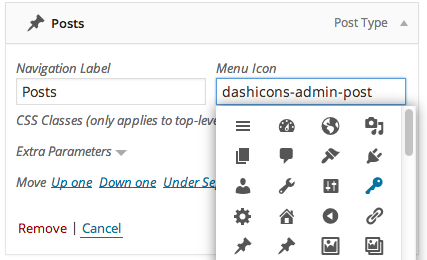
Icons can communicate as clearly as words so choosing the right icon for your admin menu items is important. To change them, simply expand a menu item and click inside the Menu Icon field. A drop down will appear which will list all the available icons. Clicking on the icon you want will automatically add it to the current menu item.
9. Save your changes!
Once you hit Save Menu, all users with the selected role will begin seeing the menu you just created.
10. Test your menus
If you want to verify that everything is working correctly and see what your users are seeing it is simple to do so. I would recommend one of two plugins which could help you do this:
- Role Quick Changer – This plugin allows administrators to easily change their role on the fly in order to experience their site as a user with another role would. Very handy.
- User Switching – Gives you the ability to switch your account to a different specific user, experience the site as they see it, and then switch back. Super useful for understanding what clients are actually seeing when they login. For testing all roles it does require that a user with each role exists that you can switch to.
Other notes
- Each role will continue using the default menu arrangement until you create a new menu for them and save it. So if there is only one role you need a custom menu for, don’t bother making one for the others. Simple as that.
- If for some reason you don’t want to use your custom menu for a certain role, it is helpful to simply hit the Off toggle next to the top save button. This will save your custom menu but will not enforce it on users with that role. Instead they will go back to seeing the default settings for their role until you decide to turn your custom menu back on.
I hope this is helpful. If you have thoughts on this tutorial, please leave a comment below. If you like the plugin, please consider leaving a review.
buy thc pills online discreet delivery