How to create WordPress shortcodes

So today we’re going to learn how to take our code snippets and turn them into handy, dandy little shortcodes.

Shortcodes are one of the coolest features of WordPress from a content creator’s perspective. They allow users to execute code segments beyond what the WYSIWYG editors can handle, keep the code consistent site wide, make things far more concise, all while editing and not having to live in fear of their code getting stripped out or boggled up when editing later. All good things.

Functions.php or plugin?

An old discussion of course. Ultimately it comes down to whether you want the shortcode to depend on the theme or not. Will you be using this shortcode on other projects? Could it be useful with a different theme? It takes almost the same amount of time whichever you choose and each will work just as well for the current project.

Let’s make a shortcode

I’m going to use a bunch of examples of actual shortcodes that I have created for recent projects.

Shortcode 1: Output string


//[op] outputs the phone number
function our_phone() {
 return "(269) 588-0556";
}
add_shortcode('op', 'our_phone');

This code will allow me and all the other authors on this site to not have to remember our phone number and also change it globally if we needed to. This was handy on a recent project where there were multiple authors on the site and multiple phone numbers. Making a shortcode like this for each one made it easier for authors put the number into their content without looking it up each time and also allowed us to change the number everywhere when we wanted to by just changing the shortcode.

Shortcode 2: Output current month


//[month] shortcode. Outputs current month.
function kjm_month() {
$kjm_date=getdate(date("U"));
return "$kjm_date[month]";
}
add_shortcode( 'month', 'kjm_month' );

This shortcode came in handy for my team because several authors were frequently writing promotional pages on the site and often the promotions were similar from month to month so this shortcode allowed them to automatically output the current month in their copy. This way they didn’t have to go back on the first of each month and update every single page that contained a monthly promotion.

Shortcode 3: Countdown timer


//[cdt] countdown timer shortcode
function content_countdown($atts, $content = null){
 extract(shortcode_atts(array(
 'month' => '',
 'day' => '',
 'year' => ''
 ), $atts));
 $remain = ceil((mktime( 0,0,0,(int)$month,(int)$day,(int)$year) - time())/86400);
 if( $remain >= 1 ){
 return $daysremain = "$remain";
 }else{
 return $content;
 }
}
add_shortcode('cdt', 'content_countdown');

Now we’re getting to a shortcode with attributes. This snippet is an only slightly modified version of one created by Kevin Chard at WPSnipp. What my version does, is it shows the number of days remaining before a specified date. This was also very handy for the authors on this site who would run monthly promotions which had an end date, and this allowed them to automatically display to the site’s visitors how many days remained before the offer would expire.  The purpose was to give a sense of urgency and drive sales.

But what’s going on inside these shortcodes

Let’s take just a second to explain some things:

  • When outputting data we always use return whereas in many normal programming instances we would use echo. Using echo will usually return some funky results.
  • The add_shortcode() function accepts two parameters. The first is the shortcode you want to create (the word(s)/phrase you enter in the square brackets) and the second is the function that it will execute.
  • Best practice for your shortcode names and attribute names would be lowercase.

There are truly thousands of things you could do with shortcodes. I greatly appreciate the ability to condense code snippets and re-use them endlessly. On a different project I took a complicated archive page on a website that had hundreds of lines of code and brought it down to four lines with massive improvements.

Here are a few ideas of what you can do with shortcodes:

  • Output strings of text
  • Make buttons
  • Create forms
  • Implement social sharing buttons
  • Embed videos
  • Embed tweets
  • Embed Facebook status updates
  • Show featured posts
  • Show featured products
  • Include custom javascript
  • Create HTML elements (tables, divs, sections, etc.)
  • Insert media
  • Insert photo galleries
  • Display countdown timers
  • Display user count
  • Display comment count
  • Insert animated sliders
  • Include interactive calculators
  • Many many many more!

I’d love to learn about what shortcodes you have created or would like to create. Share in the comments below.

How to Use Console.log in Javascript

The Javascript command console.log allow us to “Print Out” to the console.  When you need to see what the computer is processing you have to ask it to show you.  The correct way to write the code is like this:

console.log("show everything between these parentheses")

This command will log to the console anything within the parentheses including strings and equations. Here are two examples:

console.log(8 * 10);
console.log("Nice to be able to see what the interpreter, the computer, is working on.");

How to display the latest tweet from a staff member on their bio page in WordPress

Why bother with this?

Our research has confirmed again and again that some of the most commonly visited pages on websites are those that pertain to the people who work there. This fact often perplexes and even frustrates many web marketers because they are rarely the pages that webmasters WANT people going to. That is to say that most people don’t build a site to show off the bios of their employees but to sell products and services. Bio pages can, of course, help with this a little but as far as conversion goes, they are not the strongest.

But despite the fact that we’d often prefer that visitors spend time checking out our services and products and doing what we want them to do, many visitors will inevitably spend a lot of time pouring over our staff bios. For this reason, it behooves us to make them worthwhile.

And…what are we doing?

One thing that we have found to be very effective in engaging visitors and keeping our site’s pages looking fresh and interactive is to integrate social media. This can start with some social sharing and follow buttons as well as some feeds like the one you’ll see in the footer of our site that give visitors an opportunity to connect more with your company and gives them a sense that you are active and engaging.

But what about the staff bio pages? We established that they are some of the most commonly visited pages on the average website so what can we do to set them apart? Perhaps an integration of each staff member’s social activity could do the trick.

At least this is what we think and this is why we opted to bring in some Twitter activity for each member of our team on their bio page so visitors can see what each person is up to and talking about in a fresh, engaging way. If you want to see the end result, just visit the bio page of any team member listed on the Real Big Marketing staff page.

1. Set up your staff pages

We really wanted to make our staff pages useful to our visitors and worth checking out so we used a plugin called CustomPress to create a custom post type called “Employees”. Then we used CustomPress again to create a custom field call “Twitter Username”. This way we can write up bios for each staff member and simply insert their username into a field. Nothing fancy yet.

2. Create your custom post template

We could probably do a tutorial on this at some point in the future but for instructions on creating your own custom post template visit this how to. It’s pretty good as is this one.

Why create the custom post type and template?

There are technically a variety of ways that we could choose to accomplish our end goal of displaying the latest tweets. However, it is important to me that the process creating the bios is simple and intuitive, plus I have loads of customizations to make to the staff pages that don’t belong on any other pages. So it makes sense to have a post type for staff and an obvious field for entering a Twitter handle and it makes my job easy to have one PHP file to modify with all of my staff related tweaks.

3. Setup Latest Tweets plugin

1) We’ll start by installing the Latest Tweets plugin. For what we are about to do we will be needing version 1.1.0 of this plugin which at the time of this writing has not yet been released. So all we have to do is download the development version of the plugin under the Developers tab and we are golden.

Once downloaded we can upload, install and activate the plugin within WordPress.

2) Next we need to create a Twitter App and obtain our API keys. Once we have completed the setup for the app, we need to go to our site’s Dashboard – – > Settings – – > Twitter API and enter all four keys. Once this is done, our Twitter requests will be authenticated and will work with the Twitter API 1.1.

create-twitter-add

4. Throw in the code!

Time to really get our hands dirty. The first thing we want to do is determine where we want to display the latest tweet and then throw in the necessary script to make it show up. After that we’ll spruce it up a bit.

[toggle title_open=”Old way (no longer works)” title_closed=”Old way (no longer works)” hide=”yes” border=”yes” style=”default” excerpt_length=”0″ read_more_text=”Read More” read_less_text=”Read Less” include_excerpt_html=”no”]

This method for displaying content from Twitter was stopped by Twitter in June of 2013. Now all content requests must be authenticated.

1) We’ll start by inserting the necessary scripts to get the info from Twitter (special thanks to webdesigndev):


<script type="text/javascript" src="http://twitter.com/javascripts/blogger.js"></script>
<script type="text/javascript" src="http://api.twitter.com/1/statuses/user_timeline.json?count=1&exclude_replies=true&screen_name=[username_here]&callback=twitterCallback2"></script>

2) Then we can grab our custom field value which will contain the username of the staff member:


<?php

$stafftwit=get_post_meta($post->ID,'ct_Staff_Twit_text_abd5',true);

?>

Here I simply created a PHP variable called $stafftwit and set it to be the value of the custom field ‘ct_Staff_Twit_text_abd5’.

3) Throw the PHP variable into the Twitter API call.


<script type="text/javascript" src="http://api.twitter.com/1/statuses/user_timeline.json?count=1&exclude_replies=true&screen_name=<?php echo $stafftwit; ?>&callback=twitterCallback2"></script>

This is the same code as above, only I inserted the PHP variable $stafftwit where the username should be.

4) Throw in some HTML for displaying. This is my final code in my staff.php template:

<?php $stafftwit=get_post_meta($post->ID,'ct_Staff_Twit_text_abd5',true); ?>

<div class="latest_tweet">
<div class="twitter">t</div>
<h4>Latest tweet:</h4>
<div id="twitter_update_list"></div>
<?php echo do_shortcode("[tweets max=1 user=".$stafftwit."]"); ?>
<a href="https://twitter.com/<?php echo $stafftwit; ?>" class="twitbutton">@<?php echo $stafftwit; ?></a>
</div><!--latest_tweet-->

[/toggle]

1) We will now open up our new staff post template and start inserting our code where we want the tweets displayed. First lets grab our custom field value which will contain the username of the staff member:


<?php

$stafftwit=get_post_meta($post->ID,'ct_Staff_Twit_text_abd5',true);

?>

Here I simply created a PHP variable called $stafftwit and set it to be the value of the custom field ‘ct_Staff_Twit_text_abd5’.

2) Put in some PHP to render the shortcode from the Latest Tweets plugin (this is why we needed version 1.1.0). I also set it to display only one tweet.


<?php echo do_shortcode("[tweets max=1]"); ?>

3) Throw the PHP variable into the shortcode.


<?php echo do_shortcode("[tweets max=1 user=".$stafftwit."]"); ?>

This is the same code as above, only I inserted the PHP variable $stafftwit where the username should be.

4) Throw in some HTML for displaying. This is my final code in my staff.php template:

<?php $stafftwit=get_post_meta($post->ID,'ct_Staff_Twit_text_abd5',true); ?>

<div class="latest_tweet">
<div class="twitter">t</div>
<h4>Latest tweet:</h4>
<div id="twitter_update_list"></div></pre>
<?php echo do_shortcode("[tweets max=1 user=".$stafftwit."]"); ?>
 <a href="https://twitter.com/<?php echo $stafftwit; ?>" class="twitbutton">@<?php echo $stafftwit; ?></a>
<pre></div><!--latest_tweet-->

5) Style with some CSS:

.latest_tweet {
float: right;
width: 200px;
color: rgb(126, 179, 196);
font-style: italic;
font-size: 14px;
}
.latest_tweet h4 {
color: #BBB;
margin: -50px 0 0 0;
}
.latest_tweet h4, #twitter_update_list {
position: relative;
}
.latest_tweet a {
color: #8B9BAF;
}
.single-staff .services_more .col-right {
width: 340px;
}
.latest_tweet .twitter {
font-family: JustVector;
font-size: 190px;
color: #F0F0F0;
margin: 0px 0 0 -42px;
}
a.twitbutton {
font-size: 11px;
color: #D1D1D1;
font-weight: bold;
}
a.twitbutton:hover {
color: #8BA1BD;
text-decoration: none;
}
.latest-tweets ul li p, .latest-tweets ul {
margin: 0 0 0.7em 0;
}

And there you have it! This is basically all I did to get the latest tweet displayed for each staff member. You may notice some interesting things here like the usage of a vector font for the Twitter icon I placed behind the tweet. That’s just making things a little more fun.

I hope you find this simple tutorial helpful. Please leave some comments if you have any questions or suggestions on how this could be improved and what other topics might be useful to cover. Thanks for stopping by!

Guide to using CSS attribute selectors

I recently encountered a new request on a client website that introduced me to an extremely cool CSS trick. We were working on an e-commerce website that featured hundreds of different products but all were from six specific, well known brands. We observed that it would be very useful to the site’s visitors to be able to easily distinguish between the products offered by the six brands as they browsed the site’s catalog and navigated through pages and pages of choices.

I brainstormed a little and came up with the idea of theming the “Read more” button that people would be clicking on to view a product according to the brand’s colors. After a little research, I found that this was possible by using CSS attribute selectors.

I first discovered a great intro to this CSS trick on (what else) CSS Tricks which is one of my favorite websites. This got me started and I managed to make my vision a reality with just a few of my own additions.

To really make this as simple as possible, I think I’ll begin by breaking down some CSS basics.

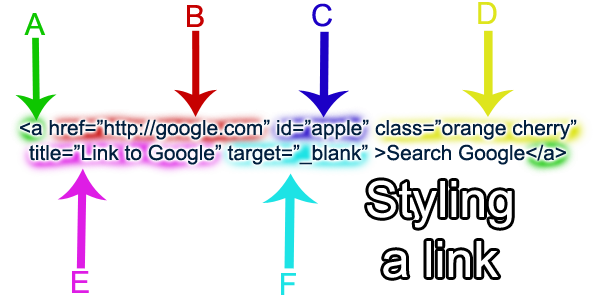
basic-css

This diagram will help us break down the various components that we can use when applying our CSS. We’ll work with this basic HTML and give examples for styling based on each part.

A. Styling by the HTML element

a {
color: blue;
}

B. Styling by the “href” attribute

a[href="http://google.com"] {
background-color: red;
}

…or something like this would work too:

a[href*="google"] {
background-color: red;
}

This example states that any links with “google” in the “href” attribute will have a red background. The asterisk indicates that if “google” is found anywhere in the URL, this rule will apply.

You could also style for certain file types. Here is how to use the “href” attribute selector to style links to a PDF file:

a[href$=".pdf"] {
font-family: "Arial" sans-serif;
}

C. Styling by ID

#apple {
font-weight: bold;
}

Any elements with the “apple” ID will have bold text.

D. Styling with classes

.orange {
outline: orange;
}

…or something like this:

.orange.cherry {
text-decoration: underline;
}

The first example sets an orange outline on anything with the “orange” class. The second states that elements with BOTH the “orange” and “cherry” classes will have an underline.

E. Styling by the “title” attribute

a[title~=Google] {
border: 1px dashed green;
}

This rule applies a dashed, green border to links that have “Google” in the title attribute.

F. Styling by the “target” attribute

a[target="_blank"] {
border-radius: 4px;
}

This example sets a border radius on links that open in a new window.

As you can see, there are loads of cool ways that we can apply our custom styling to HTML elements.

For a good example of what we did with the attribute selectors, check out the Power Barn. I hope you find this useful. Please feel free to share your own examples of what you’ve done with CSS attribute selectors.