Guide to using CSS attribute selectors
I recently encountered a new request on a client website that introduced me to an extremely cool CSS trick. We were working on an e-commerce website that featured hundreds of different products but all were from six specific, well known brands. We observed that it would be very useful to the site’s visitors to be able to easily distinguish between the products offered by the six brands as they browsed the site’s catalog and navigated through pages and pages of choices.
I brainstormed a little and came up with the idea of theming the “Read more” button that people would be clicking on to view a product according to the brand’s colors. After a little research, I found that this was possible by using CSS attribute selectors.
I first discovered a great intro to this CSS trick on (what else) CSS Tricks which is one of my favorite websites. This got me started and I managed to make my vision a reality with just a few of my own additions.
To really make this as simple as possible, I think I’ll begin by breaking down some CSS basics.
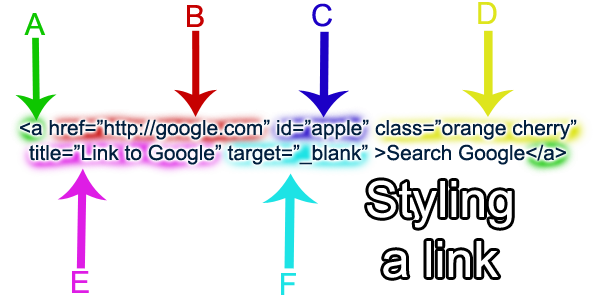
This diagram will help us break down the various components that we can use when applying our CSS. We’ll work with this basic HTML and give examples for styling based on each part.
A. Styling by the HTML element
a {
color: blue;
}
B. Styling by the “href” attribute
a[href="http://google.com"] {
background-color: red;
}
…or something like this would work too:
a[href*="google"] {
background-color: red;
}
This example states that any links with “google” in the “href” attribute will have a red background. The asterisk indicates that if “google” is found anywhere in the URL, this rule will apply.
You could also style for certain file types. Here is how to use the “href” attribute selector to style links to a PDF file:
a[href$=".pdf"] {
font-family: "Arial" sans-serif;
}
C. Styling by ID
#apple {
font-weight: bold;
}
Any elements with the “apple” ID will have bold text.
D. Styling with classes
.orange {
outline: orange;
}
…or something like this:
.orange.cherry {
text-decoration: underline;
}
The first example sets an orange outline on anything with the “orange” class. The second states that elements with BOTH the “orange” and “cherry” classes will have an underline.
E. Styling by the “title” attribute
a[title~=Google] {
border: 1px dashed green;
}
This rule applies a dashed, green border to links that have “Google” in the title attribute.
F. Styling by the “target” attribute
a[target="_blank"] {
border-radius: 4px;
}
This example sets a border radius on links that open in a new window.
As you can see, there are loads of cool ways that we can apply our custom styling to HTML elements.
For a good example of what we did with the attribute selectors, check out the Power Barn. I hope you find this useful. Please feel free to share your own examples of what you’ve done with CSS attribute selectors.