Official: The most basic type of DNS record used to point a domain or subdomain to an IP address.
CNAME
DNS record that maps an alias name to the true domain name.
Domain
Site address purchased from a registrar.
IP Address
Unique numeric string separated by periods that identifies each computer using the Internet Protocol to communicate over a network.
Domain Name Server, DNS, or Name Server
A computer that hosts a network service that provides responses to queries against a directory service, like what we would call a phone book. It translates word based addresses to IP addresses.
Registrar
A company or organization that manages the registration of domain names and maintains the official registration information. A domain name registrar must be accredited by a generic top-level domain (gTLD) registry and/or a country code top-level domain (ccTLD) registry.
DNS Propagation
The time required for DNS changes made to a DNS zone to be observed at the client. DNS entries are cached by many applications including browsers and other DNS servers. A cached DNS entry will be saved locally and reused for every request until the cached entry expires on the server. Typically 12 to 24 hours.
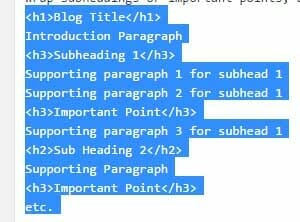
In a previous post on How to Use Heading Tags. We left out a key piece of information, defining what a title tag designates, and what it does not. Headings tags wrap headlines or important points only. Applying them designates the wrapped content as a headline of some type. They do not designate or wrap the section of body copy supporting the headline. The h1 tag wraps the blog title. An h2 tag could wrap section headings. H3 tags could wrap subheadings or important points, but you don’t wrap a whole paragraph in an h tag. Here’s an example:
Each bit of copy wrapped in <h#> tags above is simply a headline of one type or another. The supporting paragraphs of information that come after are not wrapped in header tags. Instead, they are the supporting information for the headline.
HTML Header Tags , or heading tags, as their name suggests, differentiate the types of headings and subheadings in a blog post. Some people call them head tags or SEO header tags.
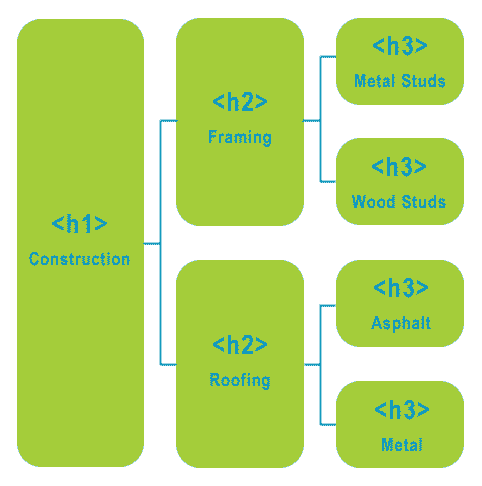
H1 through h6 tags designate a top down hierarchy of importance in html.
The h1 tag is the most important tag. Every page should have a single h1 tag reserved for the title of the article, page or product. H2 through h6 are then used for decreasingly significant titles. We do not break the chain or skip levels of the hierarchy as we write to maintain on-page SEO. For example, if your page title is an h1 tag and you immediately follow that with an h4 tag, the hierarchy is broken. It makes the heading structure harder for the search engine to crawl and categorize.
Advantages of Using Heading Tags
Structure your heading tags for search
Prepare and segregate content for end users
Improve site accessibility for people with disabilities
Header tags and SEO:
Search engines succeed when they provide more recent, relevant content than their competitors. To establish relevancy, they compare the words in the header tags with the content in respective sections. Google, Bing and other search engines use a program called a spider to crawl your posts, pages and products. It sends your content back for their servers and algorithms to measure the content. One of the most important measurements is keyword consistency.
The h1 is the most important tag and should never be skipped
The comparison starts with the H1 Tag. This tag provides a basic description which all successive content is compared. Search spiders pay special attention to the words used in the h1 tag. Because of this, it should contain a basic description of the page content, In WordPress, your page title is automatically made into your h1 tag.
Search engines don’t just measure everything against the h1 tag. H2 through h6 tags are measured as well. Each successive SEO header tag should be supported with a paragraph or more of relevant content. There is no magic number of words, use what is required to support your content.
The primary use of heading tags is for SEO, not to gain the larger, more prominent fonts. However, well thought out styling, applied via CSS enhances and standardizes the presentation of a web page. It provides a cleaner look.
Head Tags to Enhance UX:
Heading tags give the user a clear idea of what the page content is about. The human eye scans content easily with head tags in place. By reading the different heading tags, users can scan a page and read only the section they are interested in.
You’ll improve readability, time on site and click through rates by properly implementing head tags. As a side benefit, search engines give a great deal of importance to user-experience on a site, meaning the presence of heading tags becomes an important component of SEO.
Header Tags and Accessibility:
Poorly structured content makes it difficult for users of screen readers to navigate and harder to understand what they are being presented with. by taking the time to identify your titles when you write, you save end users with screen readers countless hours of frustration.
It’s each bloggers responsibility to properly structured headings on a page.
There are accessibility standards we should all strive to achieve. We begin to address many of these standards, such as providing navigable, readable, predictable & compatible content, through the proper use of heading tags. These tags enhance content readability and make your web pages appear and operate in predictable ways. Heading Tags also maximize compatibility with current and future user agents, including assistive technologies. They provide ways to help users navigate, find content, and determine where they are.
Things you should not be doing with heading tags
Do not stuff your heading tags with keywords – Use what’s necessary to provide a short, sensible description.
Do not use more than one h1 tag on a page – One h1 heading per page lets everyone know what one thing to expect in the content.
Do not use heading tags as hidden text – Hidden text has long been decried by search engines and users. It never helps and always causes penalties for your site ranking.
Do not repeat heading tags on different pages of your site. It’s confusing to search engines and users. Maintain unique heading tags sitewide.
Do not use identical content for both your page’s h1 tag and meta title tag – Differentiating the two enhances SEO and enhances usability.
Do not use heading tags for styling text – Use CSS to accomplish styling and use header tags to organize and structure content.
Lately I’ve had quite a few conversations with fellow web developers looking for guidance on how to win an RFP. We’ve been blessed recently with quite a few successes and I’d like to share a little secret with you, the same secret I’ve shared with them. Winning RFPs simply comes from listening. Understanding your clients needs and demonstrating you can meet them quantitatively.
You don’t win RFPs by betting on qualitative information, hoping for uneducated customers or relying on slick salesmen. You don’t win RFPs by having been in business longer than your competitor, by having more sites or by having a huge staff. You win RFPs by demonstrating good work, by matching the right staff to the project, and by showing the client your capability to exceed their expectations.
We’ve all felt insecurities but they are just that, insecurities. Remember these two things; 1) RFPs are part of a vetting process designed to separate wheat from the chaff and 2) RFPs are often written by committee so simple, clear objectives are hard to come by. This is where the saying, “Fail quickly” comes to mind. It’s OK to be the chaff, but find out quickly by identifying objectives, understanding why the objectives exist, and proving whether you meet the need. Base your decision on facts, not insecurities.
Achieving 100% compliance and traceability shows that you understand the project from the clients point of view
As to whether you’re wheat or chaff for the project you’re looking at right now, find out fast by bringing a Requirements Traceability Matrix, RTM, into your bidding workflow. In programming, this can be an extensive project in itself, but here we are using simplified chart to prove, through small Test Cases, whether you can fulfill each requirement. It’s an easy way to see how requirements relate to services. When you’re done, you’ll know whether to bid with confidence or no-bid.
How do you set up a Requirements and Test Cases for a Traceability Matrix?
Set up a graph and create three columns titled Requirement, RFQ Location and Response Location. list what the client wants, their Requirements, vertically under the first column. Now show the relationship to the RFP by filling in the second column where the request is located. Your ability to fulfill a need is the result of a Test Case, often referred to as a Test Oracle. If you move forward, you’ll have to write out the proposal. What better way to start than with all of the Test Cases and their related Test Oracles in a concise outline.
Proving your capabilities in outline format in a separate document and listing the numbers from your outline in the third column of your chart provides an easy to follow index for your team and for your client. As a side note, you’ll often find that your clients will refer back to the RTM you’ve created as the basis for determining project completion. That in itself is a key differentiator.
What does an RTM look like for ?
The list of requirements can become extensive, but let’s look at what a few examples would look like in chart format:
Requirements Traceability Matrix
Requirement
RFQ Location
Response Location
Name, Title, Address of three references
Section 3
I
Ability to complete the project within the allotted timeline
Section 4
II
Development of 3 Custom Post Types
Section 5
III
——————————————————————————————————
The corresponding Response Location’s outline would look like this:
I. Name, title and address of three references:
A. Name, Title and address of reference 1
B. Name, Title and address of reference 2
C. Name, Title and address of reference 3
II. Ability to complete the project within the allotted timeline:
A. Schedule clear for dates specified in RFQ Section 4. Ability to complete reviewed by KM and JW.
B. Real Big Marketing is able to begin the project upon issue of purchase order per client request and will be completely implemented no later than August XX, XXXX(NOTE: Per client instruction this excludes Section 12 – Content Migration).
III. Development of 3 Custom Post Types and 3 corresponding templates:
A. Per RFP Section 5, client requires three CPTs; 1) Testimonials, 2) Coupons, 3)Staff. Reviewed by SB, KM, JW. No technical barriers. Add .5 hours to meet design spec.
——————————————————————————————————
It’s a simple solution to remove the insecurities and make the bid/no-bid decision. Wheat or chaff, you’re streamlining your RFP response process. When you decide to bid, you’ll find that you’re tightly aligned to the client. You can quickly demonstrate, point-by-point, that you’ll meet and exceed their expectations. No slick salesman required, just build out the outline. You’re more qualified than you think.
This week is an exciting one for Real Big Marketing. After years of focusing exclusively on providing quality services to clients, we will officially be releasing our first product: Render. We’ve worked hard to make Render as powerful and as useful as possible to those who use WordPress as a content management system and I think we’ve done a pretty good job. Much of the credit for this goes to our amazingly talented developer Joel who joined our team last summer.
But our excitement is not due only to this new offering our business will be adding. We are also excited to announce that through Render, we are going to be adding something else to our business: donations to a cause. At Real Big we strongly believe that businesses have a responsibility to do more than focus on profits alone. It is important to invest in and seek to better our community and to constantly strive to make a difference in the lives of others. To this end, we’ve decided that the launch of Render is the perfect opportunity to incorporate this kind of contribution into our business. Enter Happy Joe.
Happy Joe
Happy Joe is a non-profit organization which focuses on helping veterans succeed in this digital age. By helping former military men and women develop skills, find jobs and start businesses, Happy Joe is truly making a difference to others. The organization was founded by James Dalman who is a veteran himself and also a talented designer and WordPress guru.
I reached out to James recently to let him know that we supported Happy Joe and also that we were very interested in doing what we could to support his efforts to help veterans. Our company is 50% veteran owned and supporting those who served our country is something we strongly believe in. I also told James that we were a small company and couldn’t afford to make a very sizable one-time donation. However, we did have a new product launch in the works and would be interested in using that as an opportunity to contribute. I also explained to James that giving in this manner would be ideal for us because ultimately, we want giving to be something that we DO rather than something that we DID.
James was very supportive of the concept of continuous giving and expressed to me that he’d like to introduce it as an alternative way of supporting Happy Joe for prospective sponsors. We would be the first to pioneer this new program and hopefully inspire others to follow suit and make giving to Happy Joe a part of what they DO as well.
Our contribution
After several discussions with James and an evaluation of our own financial goals, we decided that we would commit to donating 25% of all sales of Render directly to Happy Joe. We believe this amount is enough to make a real difference while allowing us to remain sustainable and continue to grow this portion of our business.
An official announcement from Happy Joe can be found on their blog. In that announcement you’ll also see a video of James and I discussing this partnership as well as the Render plugin. You can also learn more about James in an upcoming episode of WP Round Table in which myself and several friends will be interviewing Mr. Dalman and digging deeper into his experiences, challenges, hopes, ideas and goals.
Your part
Happy Joe is making a difference but there is still a lot to do. If you are interested in doing your part to help better the lives of military veterans and their families then visit the Happy Joe website, follow Happy Joe on Twitter, contact James Dalman and, if you use WordPress and need a better way to include complicated elements into your content then consider checking out Render.
 The h1 tag is the most important tag. Every page should have a single h1 tag reserved for the title of the article, page or product. H2 through h6 are then used for decreasingly significant titles. We do not break the chain or skip levels of the hierarchy as we write to maintain on-page SEO. For example, if your page title is an h1 tag and you immediately follow that with an h4 tag, the hierarchy is broken. It makes the heading structure harder for the search engine to crawl and categorize.